
This manual provides essential guidance for assembling, operating, and maintaining the Hyper Tough 20 Inch Lawn Mower, ensuring safe and efficient mowing experiences.
1.1 Importance of the Manual for Proper Operation
The manual is crucial for safe and effective use of the Hyper Tough 20 Inch Lawn Mower. It provides detailed instructions for assembly, operation, and maintenance, ensuring optimal performance and longevity. Following the manual reduces the risk of errors and potential damage to the mower, while also enhancing user safety and mowing efficiency.
1.2 Overview of the Hyper Tough 20 Inch Lawn Mower Features
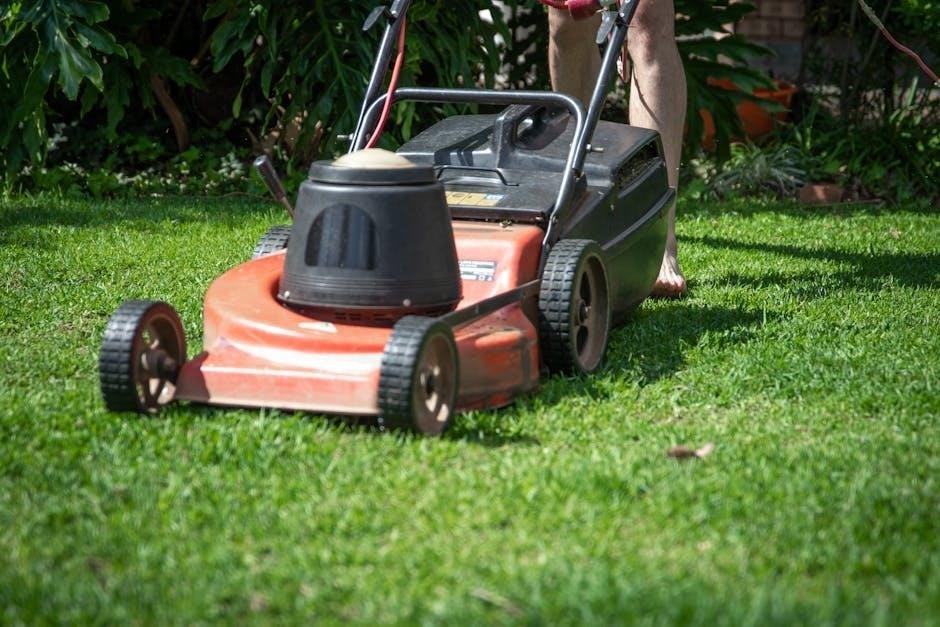
The Hyper Tough 20 Inch Lawn Mower features a robust 159cc 4-cycle engine, providing reliable power for consistent cutting. Its 20-inch steel cutting deck offers adjustable height settings, allowing precise mowing. Additional features include a side-discharge option and lightweight design, making it easy to maneuver. The mower also comes with ergonomic handles and durable wheels for enhanced stability and control during operation.

Key Features of the Hyper Tough 20 Inch Lawn Mower
Featuring a 159cc 4-cycle engine, 20-inch cutting width, and adjustable height settings, this mower offers power, efficiency, and versatility for optimal lawn care results.
2.1 Engine Specifications and Power Output
The Hyper Tough 20 Inch Lawn Mower is equipped with a reliable 159cc 4-cycle gas-powered engine, delivering consistent power for efficient cutting. Its robust design ensures smooth operation across various lawn conditions, eliminating the need for batteries or cords, making it a convenient and durable choice for homeowners seeking reliable performance in a compact mower.
2.2 Cutting Width and Adjustable Height Settings
The mower features a 20-inch steel cutting deck, allowing for efficient mowing with fewer passes. It offers adjustable height settings from 1.5 to 4 inches, providing precise control over cutting lengths. This versatility ensures a clean, even cut on various grass types and lengths, making it adaptable to different lawn care needs and preferences for a professional finish.
2.3 Maneuverability and Weight Distribution
The Hyper Tough 20 Inch Lawn Mower weighs approximately 50 pounds, making it lightweight and easy to maneuver. Its balanced design ensures smooth operation, while the 7-inch front and 8-inch rear wheels enhance stability and traction. This combination allows for effortless navigation around obstacles and uneven terrain, providing a comfortable mowing experience for users of all skill levels.
Assembly and Setup Instructions
The Hyper Tough 20 Inch Lawn Mower requires minimal assembly, primarily attaching the handles. The process is quick, typically taking 5 minutes or less, and is straightforward for most users.
3.1 Step-by-Step Assembly Guide
Begin by unboxing and inspecting all components. Attach the handles using the provided bolts, ensuring they are securely tightened. Adjust the tire pressure as needed. Refer to the manual for torque specifications. Finally, perform a quick check to ensure all parts are properly aligned and functional before first use. This ensures a safe and efficient mowing experience.
3.2 Tools and Parts Required for Assembly
The assembly requires basic tools like a wrench, screwdriver, and pliers. Parts include handlebars, mounting bolts, washers, and nuts. The mower arrives partially assembled, with handles needing attachment. Ensure all components are included and refer to the manual for specific torque specifications. Check tire pressure and alignment before final assembly to ensure proper function and safety;

Operating the Hyper Tough 20 Inch Lawn Mower
Start the engine using the manual pull-cord, ensure the mower is on a level surface, and follow safety guidelines for optimal performance and mowing efficiency.
4.1 Starting and Stopping the Engine
The Hyper Tough 20 Inch Lawn Mower features a reliable 125cc Briggs & Stratton engine. To start, ensure the mower is on a level surface and use the manual pull-cord. Follow the choke and throttle settings, priming the engine if necessary. Allow it to warm up before mowing. To stop, reduce the throttle, engage the brake, and turn off the ignition. Always wear protective gear and secure loose clothing for safety.
4.2 Mowing Techniques for Optimal Results
To achieve optimal mowing results with your Hyper Tough 20 Inch Lawn Mower, maintain a steady pace and overlap each pass slightly to ensure an even cut. Adjust the mowing height based on grass type and condition, and keep the blade sharp for precise cutting. Mow in a consistent pattern, turning at the edges carefully to avoid tearing the grass; Regularly edging and trimming will enhance efficiency and maintain a clean, professional-looking lawn.

Maintenance and Troubleshooting
Regular maintenance ensures optimal performance. Check oil levels, clean the air filter, and sharpen the blade. Troubleshoot common issues like poor starting or uneven cutting by consulting the manual.
5.1 Regular Maintenance Schedule
A well-structured maintenance routine ensures the Hyper Tough 20 Inch Lawn Mower operates efficiently. Daily checks include inspecting the mower deck and ensuring proper tire pressure. Weekly, clean the air filter and sharpen the blade for optimal cutting performance. Monthly, change the engine oil and inspect the spark plug. Refer to the manual for torque specifications and part replacements to maintain safety and functionality.
5.2 Common Issues and Solutions
Common issues include the mower not starting, poor cutting performance, or uneven cutting. Solutions involve checking the air filter, spark plug, and fuel quality. Sharpening the blade regularly improves cutting efficiency. For uneven cuts, adjust the deck height evenly; Refer to the manual for torque specifications and part replacements. Regular maintenance can prevent many of these issues, ensuring smooth operation and optimal performance.
Safety Guidelines and Precautions
Read the manual thoroughly, paying attention to safety symbols like DANGER, WARNING, and CAUTION. Always wear protective gear and ensure the mowing area is clear.
6.1 Essential Safety Tips for Operators
Always wear protective gear like gloves and eye protection. Ensure the mowing area is clear of debris and obstacles. Keep children and pets away while operating. Never start the mower near open flames or sparks. Maintain a firm grip on the handlebars and stay alert. Avoid mowing on steep slopes or unstable terrain. Follow all instructions in the manual for safe operation.
6.2 Handling and Storage Safety
Store the mower in a dry, well-ventilated area away from flammable materials. Ensure the engine is cool and the tank is empty before storage. Secure the mower to prevent tipping. Use protective covers to shield from dust and moisture. Keep the mower out of reach of children. Regularly inspect for damage and ensure all parts are tightly secured after use.

Hyper Tough 20 Inch Lawn Mower Parts Manual
This section provides detailed diagrams, part numbers, and torque specifications for the mower’s components, aiding users in identifying and ordering replacement parts for proper assembly.
7.1 Detailed Parts Diagram and List
The manual includes a comprehensive diagram and list of all components, such as the engine, cutting deck, handles, and wheels, with corresponding part numbers for easy identification and replacement. This feature ensures users can quickly locate and order necessary parts, facilitating efficient maintenance and repair of their Hyper Tough lawn mower.
7.2 Ordering Replacement Parts
The manual guides users on how to identify and purchase replacement parts using the detailed parts diagram. Parts can be ordered directly through Walmart or authorized retailers, ensuring compatibility and authenticity. Users are advised to verify part numbers before ordering to guarantee proper fitment and functionality of their Hyper Tough 20 Inch Lawn Mower.

User Reviews and Feedback
Customers praise the Hyper Tough 20 Inch Lawn Mower for its affordability, ease of assembly, and reliable performance, making it a great value for small to medium yards.
8.1 Customer Satisfaction and Ratings
Customers have expressed high satisfaction with the Hyper Tough 20 Inch Lawn Mower, praising its affordability, lightweight design, and ease of use. Many reviewers highlight its excellent maneuverability and value for small to medium-sized yards. With an average rating of 4.2 stars, users appreciate its reliable performance and straightforward assembly process, making it a popular choice for homeowners seeking a budget-friendly mowing solution.
8.2 Common Praise and Criticisms
The Hyper Tough 20 Inch Lawn Mower is often praised for its powerful 159cc engine and 20-inch cutting width, which efficiently handles small to medium yards. Users appreciate the adjustable height settings and lightweight design, making it easy to maneuver. However, some critics mention the manual pull-cord start can be challenging, and the mower struggles with tall or thick grass, requiring multiple passes for an even cut.

Comparisons with Other Lawn Mower Models
The Hyper Tough 20 Inch Lawn Mower stands out for its affordability and lightweight design compared to similar models, offering a reliable 159cc engine and 20-inch cutting width.
9.1 Hyper Tough vs. Competitor Models
The Hyper Tough 20 Inch Lawn Mower offers comparable performance to pricier models with its 159cc engine and 20-inch cutting width. It is lighter and more affordable than many competitor mowers, making it an excellent choice for small to medium-sized yards. Its ease of assembly and maneuverability further enhance its appeal in the market.
9.2 Unique Selling Points of the Hyper Tough 20 Inch
The Hyper Tough 20 Inch stands out for its lightweight design, easy assembly, and affordable price without compromising on power. Its 20-inch steel deck and adjustable height settings ensure efficient cutting. The mower’s compact size and maneuverability make it ideal for smaller yards, offering great value for budget-conscious homeowners seeking reliable performance.

Manufacturer Support and Resources
Hyper Tough offers comprehensive customer service, warranty information, and additional resources like PDF manuals and troubleshooting guides, ensuring optimal support for your lawn mower needs.
10.1 Customer Service and Warranty Information
Hyper Tough provides dedicated customer service to address inquiries and concerns. The warranty covers defects in materials and workmanship, offering repairs or replacements within the specified period. For details, refer to the official manual or contact their support team directly through the provided contact information. This ensures peace of mind and reliable assistance for users.
10.2 Additional Resources and Downloads
Users can access the Hyper Tough 20 Inch Lawn Mower manual online for free, offering detailed instructions and troubleshooting guides. Additional resources include parts diagrams, torque specifications, and 3D interactive assembly instructions. These materials are available on the manufacturer’s website or through authorized retailers, ensuring easy access for optimal performance and maintenance of the mower.
The Hyper Tough 20 Inch Lawn Mower offers reliable performance and ease of use, making it a cost-effective choice for maintaining small to medium-sized lawns efficiently.
11.1 Summary of the Hyper Tough 20 Inch Lawn Mower
The Hyper Tough 20 Inch Lawn Mower is a reliable, gas-powered tool with a 159cc engine, 20-inch cutting width, and adjustable height settings. It suits small yards up to 1/4 acre, offering easy assembly and maneuverability. Designed for affordability and efficiency, it balances performance with cost, making it a practical choice for homeowners seeking a durable and user-friendly mowing solution.
11.2 Final Recommendations for Potential Buyers
The Hyper Tough 20 Inch Lawn Mower is ideal for small yards, offering ease of use and affordability. Its lightweight design and maneuverability make it a great choice for homeowners seeking a reliable, gas-powered mower. While it excels in efficiency, consider the manual pull-cord start if convenience is a priority. Overall, it provides excellent value for its price, making it a worthwhile investment for maintaining a tidy lawn.