The 2008 Honda Accord Manual provides essential guidance for owners, ensuring optimal performance and longevity of the vehicle. It covers maintenance, troubleshooting, and safety features, tailored for both novice and experienced drivers. By following the manual, owners can maximize fuel efficiency, understand warning systems, and perform routine checks effectively. This comprehensive guide is a vital resource for anyone seeking to get the most out of their 2008 Honda Accord.
1.1 Overview of the Honda Accord
The 2008 Honda Accord is a reliable and versatile vehicle known for its balance of performance, fuel efficiency, and durability. It offers a spacious interior, advanced safety features, and a responsive driving experience. Available in sedan and coupe models, the Accord caters to a wide range of drivers, from commuters to families. Its reputation for longevity and low maintenance costs makes it a popular choice among car enthusiasts and everyday drivers alike.
1.2 Importance of the Manual for Owners
The 2008 Honda Accord Manual is crucial for owners to optimize vehicle performance and ensure longevity. It provides detailed maintenance schedules, troubleshooting guides, and operational insights, helping owners address issues promptly and correctly. By following the manual, drivers can enhance fuel efficiency, reduce repair costs, and maintain safety standards. Regularly referencing the manual empowers owners to take control of their vehicle’s care, ensuring reliability and peak performance over time.
Key Features of the 2008 Honda Accord
The 2008 Honda Accord offers a powerful engine, excellent fuel efficiency, and reliable performance. It features advanced safety options like ABS and a comfortable, spacious interior design.
2.1 Engine and Performance Specifications
The 2008 Honda Accord is equipped with a 2.4-liter inline-4 cylinder engine, delivering 177 horsepower at 6,500 rpm. It offers a smooth and responsive driving experience, with a maximum torque of 161 lb-ft at 4,300 rpm. Available in both sedan and coupe models, the Accord combines efficiency with performance, making it a versatile choice for daily commuting and long-distance travel alike.
2.2 Transmission Options
The 2008 Honda Accord offers a 5-speed manual transmission and an optional 5-speed automatic transmission. The manual transmission provides precise control and smooth shifting, enhancing the driving experience. The automatic option includes a lock-up torque converter for improved fuel efficiency. Both transmissions are designed to optimize engine performance, offering a balance between power and fuel economy, catering to both enthusiast drivers and everyday commuters.
2.3 Fuel Efficiency and Reliability
The 2008 Honda Accord is renowned for its fuel efficiency, with EPA ratings of up to 31 mpg on the highway. Its reliable 2.4L and 3.5L engines, combined with advanced transmission systems, ensure consistent performance. Regular maintenance, as outlined in the manual, further enhances reliability, making the Accord a dependable choice for long-term ownership. Its reputation for durability and low maintenance costs solidifies its position as a practical vehicle.

Maintenance Schedule and Tips
Regular oil changes, tire rotations, and fluid checks are crucial for maintaining the 2008 Honda Accord’s performance. The manual outlines specific intervals for these services, ensuring reliability and longevity. Adhering to the recommended schedule helps prevent major repairs and keeps the vehicle running smoothly over time.
3.1 Recommended Maintenance Intervals
The 2008 Honda Accord manual specifies regular maintenance intervals to ensure optimal performance. Oil changes are recommended every 5,000 to 7,500 miles, while tire rotations should occur every 6,000 to 8,000 miles. The manual also advises replacing the air filter every 15,000 miles and the spark plugs at 30,000 miles. Following these intervals helps maintain fuel efficiency, reduces wear on engine components, and ensures the vehicle operates reliably over time.
3.2 Oil Change and Fluid Check Guidelines
The 2008 Honda Accord manual recommends using 5W-20 synthetic oil for optimal performance. Oil changes should occur every 5,000 to 7,500 miles. Always replace the oil filter during service. Additionally, check coolant, brake, and transmission fluids regularly. Ensure all fluid levels are within recommended specifications to maintain engine health and prevent overheating. Proper fluid maintenance enhances fuel efficiency and extends the lifespan of critical vehicle components.
3.3 Tire Rotation and Brake Maintenance
The 2008 Honda Accord manual recommends rotating tires every 6,000 to 8,000 miles to ensure even tread wear. Brake pads should be inspected every 12,000 miles, with replacements needed when worn below 1/8 inch. Check rotors for excessive wear or warping. Addressing these maintenance tasks helps maintain vehicle safety and performance, ensuring reliable braking and tire efficiency over time.

Troubleshooting Common Issues
The 2008 Honda Accord manual assists owners in identifying and resolving common issues like oil leaks, sensor malfunctions, and transmission problems promptly and effectively.
4.1 Identifying and Solving Oil Leaks
Oil leaks in the 2008 Honda Accord can often be traced to worn engine gaskets or loose connections. Regular inspection of the valve cover, oil pan, and drain plug is crucial. If a leak is detected, tightening connections or replacing gaskets may resolve the issue. Consulting the manual ensures proper diagnostic steps are followed, preventing further damage and costly repairs.
4.2 Diagnosing Faulty Sensors
Diagnosing faulty sensors in the 2008 Honda Accord involves using an OBD-II scanner to identify error codes. Check the sensor’s electrical connections and test its output against specifications. If a sensor fails, replace it with a genuine Honda part. Always consult the manual for accurate procedures to ensure proper function and prevent engine issues. Regular checks help maintain reliability and performance.
4.3 Addressing Transmission Problems
Transmission issues in the 2008 Honda Accord may include slipping gears or rough shifting. Check the transmission fluid level and condition, as low or degraded fluid can cause problems. Use an OBD-II scanner to identify error codes related to the transmission. If a leak is detected, inspect the pan gasket or fluid lines. In severe cases, consult a professional mechanic for repairs, as transmission problems can lead to costly damage if left unaddressed.

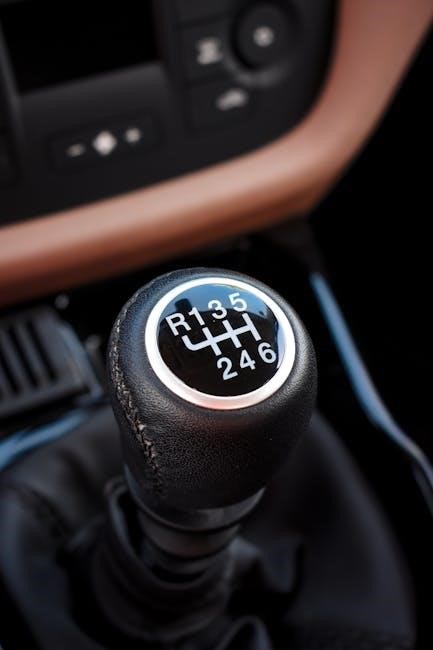
Understanding the 5-Speed Manual Transmission
The 2008 Honda Accord’s 5-speed manual transmission offers smooth gear shifts and precise control, enhancing driving performance and fuel efficiency. It appeals to driving enthusiasts seeking a engaging experience.
5.1 Driving Tips for Optimal Performance
For the 2008 Honda Accord’s 5-speed manual, smooth acceleration and clutch engagement are key. Avoid riding the clutch to prevent wear. Use the correct gear for speed and terrain to optimize fuel efficiency and performance. Shift smoothly at 2,500-3,000 RPM for better control. When decelerating, downshift before braking to reduce wear on brake pads. Proper shifting techniques enhance driving experience and extend transmission life.
5.2 Clutch Maintenance and Replacement
Regular inspection of the clutch system in your 2008 Honda Accord is crucial. Look for signs of wear such as slipping or spongy pedal feel. Replace the clutch kit every 80,000 to 100,000 miles or when worn. Ensure the flywheel is resurfaced during replacement. Proper alignment during installation prevents uneven wear. Always use genuine Honda parts for reliability. A well-maintained clutch ensures smooth shifting and extends the life of the manual transmission.

Safety Features and Precautions
The 2008 Honda Accord Manual emphasizes advanced safety features like airbags and ABS for driver protection. Regular checks ensure proper function, while precautions guide safe driving practices.
6.1 Airbag System and Safety Belts
The 2008 Honda Accord’s airbag system includes dual front, side, and curtain airbags for enhanced protection. Proper use of safety belts is crucial, as they work in tandem with airbags to minimize injury. The manual advises regular inspection of airbag lights and belt functionality. Failure to wear seat belts can reduce airbag effectiveness and increase accident risk significantly. Always ensure all occupants are properly restrained.
6.2 Anti-Lock Braking System (ABS)
The 2008 Honda Accord features an Anti-Lock Braking System (ABS) designed to improve control during hard braking. ABS prevents wheel lockup, reducing skidding and enhancing stability. Sensors monitor wheel speed, and the system rapidly pumps brakes if lockup is detected. This technology is crucial for maintaining directional control on various road surfaces. Drivers should press the brake pedal firmly and avoid pumping it for optimal ABS performance. Regular inspection of ABS components is recommended by the manual to ensure reliability.

Controls and Instrument Panels
The 2008 Honda Accord features an intuitive dashboard layout with essential controls and an instrument cluster. The panel includes buttons for climate control, audio, and cruise settings. Gauges display speed, RPM, fuel level, and temperature. Warning lights alert drivers to system issues, ensuring safety and efficiency. The design prioritizes driver convenience and clear visibility.
7.1 Dashboard Layout and Functions
The 2008 Honda Accord’s dashboard is designed for clarity and accessibility. The instrument cluster includes a speedometer, tachometer, fuel gauge, and temperature gauge. Controls for heating, cooling, and audio are centrally located. The steering wheel features integrated buttons for cruise control and audio adjustments. The dashboard also houses warning lights for system malfunctions, ensuring drivers stay informed. This layout enhances driving experience by promoting ease of use and visibility.
7.2 Understanding Warning Lights
The 2008 Honda Accord dashboard features various warning lights to alert drivers of system statuses or potential issues. Common lights include the oil level indicator, battery alert, and seatbelt reminder. Each light corresponds to specific functions, ensuring drivers are informed about vehicle conditions. Consulting the manual provides detailed explanations for each light, helping owners address concerns promptly and maintain their vehicle’s health effectively.

Customization and Upgrades
The 2008 Honda Accord offers opportunities for customization and upgrades to enhance performance, aesthetics, and comfort. Owners can modify interiors, exteriors, and engine components to personalize their vehicle, ensuring it meets their preferences and driving needs while maintaining reliability and efficiency.
8.1 Performance Upgrades
Performance upgrades for the 2008 Honda Accord can significantly enhance its driving dynamics. Owners can consider modifications such as aftermarket air intakes, performance exhaust systems, and engine tuning to boost horsepower and torque. Suspension upgrades, lightweight wheels, and high-performance tires can improve handling and stability. Additionally, upgrading the braking system ensures better stopping power, while ECU tuning optimizes engine performance for a more responsive and thrilling driving experience.
8.2 Interior and Exterior Modifications
Interior and exterior modifications can enhance both the style and comfort of the 2008 Honda Accord. Owners can upgrade seats with premium materials, add carbon fiber trim, or install aftermarket infotainment systems for a modern touch. Exterior mods include body kits, spoilers, and alloy wheels to improve aesthetics. Additionally, LED lighting upgrades and custom paint jobs can give the car a personalized look. These modifications allow owners to tailor their Accord to their preferences while maintaining its reliability and performance.
Electrical Systems and Diagnostics
The 2008 Honda Accord’s electrical systems include advanced components like the battery, fuse box, and sensors. Diagnostics tools help identify issues, ensuring reliable performance and safety.
9.1 Battery Care and Replacement
Proper care of the 2008 Honda Accord’s battery ensures reliable starting and electrical system performance. Regularly inspect terminals for corrosion and clean them with a wire brush if necessary. Check the electrolyte level in maintenance-accessible batteries and top it off with distilled water. Signs of a failing battery include slow cranking, dim lights, or age over five years. Replacement involves disconnecting the negative terminal first, removing the battery, and installing a new one with the correct specifications. Always wear protective gloves and eyewear during replacement to avoid injury from acid spills. Refer to the manual for detailed steps and safety precautions to ensure a safe and successful replacement process.
9.2 Troubleshooting Electrical Issues
Identifying electrical issues in the 2008 Honda Accord involves checking for symptoms like flickering lights or malfunctioning accessories. Start by inspecting the battery connections for corrosion or looseness. Check the fuse box for blown fuses and replace them if necessary. Inspect wiring and sensors for damage or corrosion. Consult the manual for specific error codes and diagnostic procedures; If issues persist, seek professional assistance to avoid further complications. Always follow safety guidelines when working with electrical systems to prevent damage or injury.
The 2008 Honda Accord Manual serves as a comprehensive guide, empowering owners with essential knowledge for maintenance, troubleshooting, and customization. By adhering to its instructions, drivers can enhance performance, ensure reliability, and extend the vehicle’s lifespan. This manual underscores the importance of proactive care and informed decision-making, ultimately fostering a safe and enjoyable driving experience. Refer to it regularly to maximize your Accord’s potential and maintain its exceptional quality over time.