Month: May 2025

bellissimo technika oven user guide

Safety Instructions

Always read the manual before using the oven. Keep children away while cooking. Avoid storing flammable materials near the oven. Never use abrasive cleaners. Ensure proper ventilation and avoid overheating. Regularly inspect electrical connections and ensure they are secure. Do not leave cooking unattended, especially when using alcohol-based ingredients. Always turn off the oven before cleaning. Follow all safety guidelines to prevent accidents and ensure safe operation.

1.1 General Safety Precautions

Always read the manual carefully before using the oven. Ensure the oven is installed by a licensed electrician to avoid hazards. Keep children away from the oven while cooking. Never leave cooking unattended, especially when using alcohol-based ingredients. Avoid storing flammable materials near the oven. Do not use abrasive cleaners or corrosive substances, as they can damage the finish. Ensure proper ventilation in the kitchen to prevent gas buildup. Regularly inspect electrical connections and ensure they are secure. Dispose of packaging materials responsibly. Keep the oven clean to prevent food residue buildup, which can cause fires. Always follow the manufacturer’s guidelines for operation and maintenance to ensure safe and efficient use of the appliance.

1.2 Installation Warnings

Installation of the Bellissimo Technika oven must only be performed by a licensed electrician to ensure compliance with safety standards. The appliance must be installed in accordance with the manufacturer’s instructions and local regulations. Ensure the oven is properly grounded to prevent electrical hazards. Do not attempt to modify or remove any parts during installation, as this may void the warranty or cause malfunction. The oven must be installed on a stable, heat-resistant surface and properly leveled to ensure even cooking performance. Always follow the technical specifications, such as voltage and frequency requirements, to avoid damage. Regularly inspect the installation for any signs of wear or damage. Failure to comply with these guidelines may result in safety risks or operational issues.

1.3 Cleaning Safety Tips

Always disconnect the oven from the power supply before cleaning to avoid electrical shocks. Ensure the oven is completely cool to prevent burns. Use soft, non-abrasive cloths and mild detergents to clean enameled or stainless steel surfaces, avoiding harsh chemicals that may damage finishes. For tough stains, mix baking soda and water to create a paste, applying it gently with a soft brush. Avoid using metal scourers or abrasive powders, as they can scratch surfaces. Regularly clean racks and shelves by removing them and washing in warm soapy water. Never clean glass surfaces with abrasive materials, as they may cause scratches. For self-cleaning models, follow the manufacturer’s instructions carefully. Always rinse and dry surfaces thoroughly after cleaning to maintain hygiene and appearance.

Oven Functions

The Technika Bellissimo oven features multiple cooking modes, including conventional, fan-assisted, and pizza functions, designed for versatile cooking experiences. It combines traditional heat distribution with modern fan technology for even cooking results, ensuring optimal performance for various dishes, from roasts to pizzas, with precise temperature control and efficient energy use.

2.1 Conventional Mode

Conventional mode activates the top and bottom heating elements, providing traditional oven performance with exceptional heat distribution. This mode is ideal for cooking dishes with multiple ingredients, as it ensures even browning and consistent results. It is particularly effective for roasting meats, baking cakes, and cooking casseroles. The conventional setting offers precise temperature control, allowing for tailored cooking experiences. Regularly used for everyday cooking, it delivers reliable outcomes with minimal energy consumption. For best results, preheat the oven before use and follow the recommended temperatures in the cooking guide. This mode is a versatile option for achieving classic cooking results with ease and efficiency.

2.2 Fan-Assisted Mode

Fan-assisted mode combines the top and bottom heating elements with a fan, enhancing heat circulation for faster and more uniform cooking. This mode is excellent for dishes requiring even browning, such as roasted vegetables, meats, and pastries. It reduces cooking time by up to 30% compared to conventional mode. The fan ensures that heat reaches all areas of the oven, preventing hot spots and undercooked sections. Ideal for multi-shelf cooking, it allows for simultaneous preparation of various dishes without flavor transfer. Use this mode for grilling, browning, or achieving a crispy finish on baked goods. Follow the recommended temperatures and shelf positions in the cooking guide for optimal results. This mode offers versatility and efficiency, making it a favorite for busy home cooks.
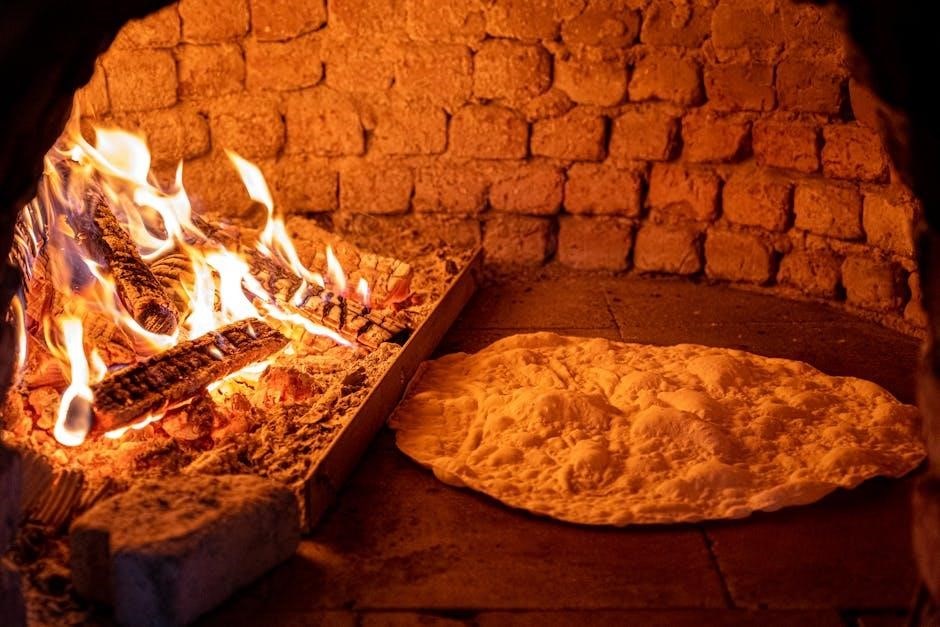
2.3 Pizza Mode

Pizza mode is designed for high-temperature cooking, activating the bottom heating element, circular heating element, and fan. This combination rapidly heats the oven, producing intense heat ideal for crispy crusts. Perfect for pizzas, large roasts, and dishes requiring quick browning. The fan ensures even heat distribution, while the bottom element provides direct heat for a perfectly cooked base. Preheat the oven to the maximum temperature before placing the pizza inside. Use a pizza stone for enhanced crust crispiness. Follow the cooking guide for recommended temperatures and cooking times. This mode is a must for achieving professional-style pizza results at home, ensuring a delicious and authentic culinary experience every time.

Cooking Guide

Explore versatile cooking options with the Bellissimo oven, offering conventional, fan-assisted, and pizza modes. Adjust temperatures and shelf positions for perfect results. Follow the guide for ideal cooking times and techniques to achieve delicious dishes effortlessly, from roasted meats to crispy pizzas and baked goods.

3.1 Practical Cooking Advice

For optimal results, preheat the oven according to the selected mode. Use lower temperatures for delicate foods like fish and higher settings for roasts. The fan-assisted mode ensures even cooking and browning, ideal for dishes like lasagna or roasted vegetables. When cooking meats, start with a high temperature to seal juices, then reduce for even cooking. Biscuits and pastries benefit from shorter baking times at moderate heat. Pizza mode is perfect for achieving a crispy crust. Always refer to the cooking guide table for recommended shelf positions and cooking times. Experiment with different functions to enhance flavors and textures, ensuring perfectly cooked meals every time.

3.2 Cooking Fish and Meat

For white meat, poultry, and fish, use temperatures between 180°C and 200°C. Red meat benefits from high initial temperatures (200°C-220°C) for searing, then reduce heat for tender results. Pat dry fish and meat before cooking to ensure even browning. Season lightly to avoid moisture retention. Place fish on the middle rack for uniform cooking, while meats like roasts should be on lower racks. Use the fan-assisted mode for crispy meat surfaces. Avoid overcrowding trays to prevent steam buildup. Let cooked meats rest before serving to retain juices. Always use a food thermometer for precise doneness. These techniques ensure perfectly cooked, flavorful dishes every time.

3.3 Using the Rotisserie

To use the rotisserie, ensure the oven is preheated to the desired temperature. Insert the rotisserie rod into the drive unit and secure it firmly. Place the food on the rod, ensuring it is balanced. Slide the rack into the oven runners, making sure the rotisserie is properly aligned. Turn the handle anticlockwise to lock the rod in place. Use the rotisserie function for even cooking of large cuts like chicken or beef. For best results, preheat the oven, season the food generously, and pat dry excess moisture before cooking. The rotisserie ensures crispy exteriors and juicy interiors. Always use oven mitts when handling hot components and avoid overloading the rotisserie. Cleaning the rotisserie regularly will maintain its performance.

Maintenance and Cleaning

Regularly clean the oven to maintain performance. Wipe spills immediately. Use mild detergents and avoid abrasive cleaners. Clean racks and shelves separately. Replace the oven lamp as needed. Ensure proper ventilation and check electrical connections. Clean the exterior with a damp cloth. For tough stains, use a gentle scrubber. Always disconnect power before cleaning. Clean the door seals to prevent damage. Regular maintenance extends the oven’s lifespan and ensures optimal cooking results.

4.1 Routine Cleaning

Regular cleaning is essential to maintain your Technika Bellissimo oven’s performance. Always disconnect power before cleaning. Wipe down the exterior with a damp cloth to prevent grease buildup. For internal cleaning, remove racks and shelves and wash them in warm, soapy water. Use a soft brush or sponge to clean interior surfaces, avoiding abrasive materials. For tough stains, mix baking soda and water to create a paste, apply it, and let it sit overnight before wiping clean. Clean the oven door by removing it and soaking in warm water. Regular cleaning prevents food residue from hardening and ensures optimal cooking results. Avoid using harsh chemicals or metal scourers, as they can damage surfaces. Clean the door seals regularly to maintain a tight closure. This routine will keep your oven in excellent condition and prolong its lifespan.

4.2 Replacing the Oven Lamp

To replace the oven lamp, first disconnect the power supply to the oven for safety. Locate the lamp, typically found at the rear of the oven cavity. Remove the protective glass cover by taking out the screws. Allow the lamp to cool completely before handling. Carefully pull out the old lamp and replace it with a new one of the same wattage and type. Replace the glass cover and secure it with the screws. Turn the power back on and test the lamp. If unsure, consult a professional. Always use genuine or compatible replacement bulbs for optimal performance and safety.

4.3 How to Remove the Oven Door

To remove the oven door, open it fully and locate the hinges at the bottom. Lift the door slightly and slide it forward to disengage it from the hinges. Handle with care, as the door can be heavy. Place the door on a soft surface to prevent scratching. For easier removal, ensure the oven is cool and clean the hinge area beforehand. Once removed, store the door securely. Reattach by aligning the hinges and lowering gently into place. Ensure the door is properly aligned to function correctly. If unsure, refer to the manual or contact a professional for assistance. Always handle the door with caution to avoid injury or damage.

Troubleshooting and Repair

Identify common issues like error codes or uneven heating. Check power supply, ensure preheating, and consult the manual for specific solutions. Contact support if unresolved.

5.1 Common Issues and Solutions

Common issues with the Technika Bellissimo oven include error codes, uneven heating, or the oven not turning on. For error codes, refer to the manual for specific solutions. If the oven doesn’t heat, check the power supply and ensure the circuit breaker isn’t tripped. Uneven heating may require adjusting the shelves or ensuring proper airflow. Clean the oven regularly to avoid food residue buildup. If the display isn’t working, restart the oven or check for loose connections. For persistent issues, contact Technika support. Always follow the troubleshooting guide in the manual before attempting repairs. Regular maintenance can prevent many common problems.

Warranty Information

The Technika Bellissimo oven is covered by a 2-year warranty for domestic use, commencing from the date of purchase. This warranty protects against electrical or mechanical faults, provided the oven is used as intended. Valid proof of purchase is required for warranty claims. The manufacturer reserves the right to repair or replace faulty components. Exclusions include damage from misuse, improper installation, or external factors like power surges. Regular maintenance and adherence to user guidelines are essential to uphold warranty validity. For detailed terms, refer to the warranty section in the manual. Keep your purchase receipt and product registration details safe for any warranty-related inquiries.

Installation Instructions

Installation must be performed by a licensed electrician. Ensure the oven is placed on a stable, heat-resistant surface. Connect to a 220-240V power supply. Level the appliance for proper operation and secure it firmly to prevent movement during use. Follow all local electrical regulations and manufacturer guidelines for safe installation.

7.1 Technical Requirements

The Technika Bellissimo oven requires a 220-240V power supply at 50-60Hz. Ensure the installation site is level and heat-resistant. The appliance must be installed by a licensed electrician to meet safety standards. Model TGO910TBK specifications include a usable capacity of 90cm. The power cord must be replaced by authorized personnel if damaged. Technical requirements also specify proper ventilation and adherence to local electrical regulations. Ensure the oven is securely fastened to prevent movement. Refer to the manual for detailed electrical connections and compliance with safety certifications. Always follow manufacturer guidelines for optimal performance and safety.

7.2 Step-by-Step Installation Guide

Ensure the installation site is level and heat-resistant. 2. Position the oven in the allocated space, ensuring proper ventilation. 3. Connect the power supply according to the technical specifications (220-240V, 50-60Hz). 4. Secure the oven to prevent movement during use. 5. Install the appliance only in compliance with local electrical regulations. 6. Ensure all connections are made by a licensed electrician. 7. Test the oven controls and functions before first use. 8. Refer to the manual for specific model requirements, such as the TGO910TBK. Follow these steps to ensure safe and correct installation of your Technika Bellissimo oven.

southampton ny guide

Southampton, NY, is a luxurious coastal town on Long Island, known for its pristine beaches, rich history, and vibrant cultural scene, offering something for everyone.

Overview of Southampton, NY

Southampton, NY, is a picturesque coastal town on Long Island, renowned for its stunning beaches, elegant estates, and rich history. This charming destination attracts visitors with its blend of natural beauty, cultural attractions, and upscale amenities. From serene coastal walks to vibrant arts scenes, Southampton offers a perfect mix of relaxation and sophistication, making it a beloved summer retreat for both locals and tourists alike.

Historical Background

Founded in 1640 by English settlers, Southampton, NY, boasts a rich history as one of Long Island’s oldest communities. Originally a farming and whaling village, it evolved into a luxury summer destination in the 19th century. Its historic estates, museums, and landmarks reflect its colonial past and Gilded Age splendor, preserving a legacy that attracts history enthusiasts and visitors seeking timeless charm and cultural depth.

Geographic Location and Climate

Located on the east end of Long Island, Southampton, NY, is a picturesque coastal town in Suffolk County. Its scenic beaches and rolling landscapes make it a popular destination. The climate is maritime-influenced, with warm summers and mild winters. The Atlantic Ocean regulates temperatures, offering cool ocean breezes in summer and protection from extreme cold in winter, creating an ideal setting for year-round visits and outdoor activities.

Best Attractions in Southampton, NY

Southampton, NY, offers a mix of stunning beaches, historic landmarks, and family-friendly activities, making it a versatile destination for both relaxation and cultural exploration.

Top Beaches in Southampton

Southampton boasts pristine beaches like Cooper’s Beach and Main Beach, offering crystal-clear waters and soft sands. These scenic spots are perfect for swimming, sunbathing, and enjoying stunning sunsets. With amenities like picnic areas and water sports, they attract visitors seeking relaxation and adventure, making them a must-visit during your stay in Southampton, NY.

Cultural and Historical Landmarks

Southampton is rich in history and culture, featuring landmarks like the Southampton Arts Center, which hosts exhibitions and performances. The Thomas Halsey Homestead, a historic house museum, showcases 18th-century life. Visit the Old Whaler’s Church, a stunning example of 19th-century architecture, or explore the Rogers Memorial Library, a historic hub for learning and community events, blending heritage with modern cultural experiences.

Family-Friendly Activities

Southampton offers a variety of family-friendly activities, including visits to Cooper’s Beach, where kids can enjoy playgrounds and calm waters. The Children’s Museum of the East End features interactive exhibits perfect for younger children. Families can also explore the LongHouse Reserve, a scenic park with gardens and outdoor art, or participate in nature walks and educational programs at the Southampton Trails Alliance Nature Reserve.

Outdoor Activities in Southampton, NY

Southampton offers a variety of outdoor activities, including beach sports, hiking trails, and water adventures. Explore nature reserves, go kayaking, or enjoy biking along scenic paths.

Beach Activities and Water Sports

Southampton’s pristine beaches provide a wide range of activities, including swimming, surfing, and paddleboarding. The calm, clear waters are perfect for kayaking and sailing, ideal for both families and adventure seekers. With equipment rentals readily available, visitors can fully immerse themselves in the beauty of the ocean, surrounded by stunning natural scenery, creating an unforgettable experience in this coastal paradise.

Hiking and Biking Trails

Southampton offers scenic hiking and biking trails that cater to all skill levels, with routes winding through lush forests, coastal dunes, and historic sites. The Paumanok Path and Long Island Trail are popular choices, offering breathtaking views of nature and wildlife. Bike rentals are readily available, making it easy to explore the area’s picturesque landscapes. These trails provide a perfect blend of adventure and tranquility, ideal for families and outdoor enthusiasts alike.

Boating and Fishing Spots

Southampton’s stunning harbors and bays make it a boater’s paradise, with numerous marinas offering dockage and rentals. Fishing enthusiasts enjoy abundant opportunities in both saltwater and freshwater, catching species like striped bass and bluefish. The area’s rich marine life and serene waters provide an idyllic setting for both seasoned anglers and newcomers alike.

Dining and Nightlife in Southampton, NY

Southampton offers a vibrant dining scene with upscale restaurants, fresh seafood, and casual eateries. The nightlife features trendy bars, lounges, and live music venues for all preferences.

Top Restaurants in Southampton

Southampton boasts exceptional dining with renowned restaurants like The American Hotel, offering refined seasonal dishes. Wolffer Kitchen and 75 Main provide vibrant atmospheres with fresh seafood and farm-to-table cuisine. These eateries cater to diverse tastes, ensuring memorable experiences with their unique flavors and elegant settings.

Local Cuisine and Seafood

Southampton’s local cuisine emphasizes fresh, locally-sourced ingredients, particularly seafood. Clam chowder, lobster rolls, and grilled fish are popular dishes. Farm-to-table eateries showcase seasonal produce, while waterfront restaurants offer breathtaking views. The town’s culinary scene blends classic East Coast flavors with innovative twists, creating a dining experience that highlights its coastal charm and rich agricultural heritage.

Best Bars and Lounges

Southampton’s nightlife thrives with upscale cocktail bars, cozy lounges, and vibrant waterfront spots. Enjoy handcrafted drinks, live music, and stunning sunset views. From trendy mixology bars to laid-back pubs, there’s a spot for every vibe. Local favorites serve craft beers, wines, and signature cocktails, making it a perfect destination for both relaxation and lively gatherings.

Shopping in Southampton, NY

Southampton offers an upscale shopping experience with luxury boutiques, art galleries, and charming local shops; Discover unique finds, from high-end fashion to handmade crafts and fresh produce.

Boutique Shopping

Southampton’s boutique shopping scene offers a variety of exclusive stores, from high-end fashion to unique home decor. Visitors can explore designer labels, artisanal jewelry, and curated collections. The town’s charming boutiques provide a personalized shopping experience, catering to diverse tastes and preferences, making it a haven for both luxury seekers and those looking for one-of-a-kind treasures.

Local Artisans and Crafts

Southampton is home to a thriving community of local artisans and craftspeople, offering unique, handcrafted pieces. From handmade jewelry to pottery and textiles, visitors can discover one-of-a-kind creations that reflect the area’s rich artistic heritage. Local markets and galleries showcase these talents, providing a perfect opportunity to support local creators and take home authentic Southampton treasures.

Farmers Markets

Farmers Markets

Southampton’s vibrant farmers markets showcase the best of local produce, artisanal goods, and handmade crafts. Seasonal markets offer fresh fruits, vegetables, and flowers, while specialty vendors provide gourmet cheeses, baked goods, and organic products. These gatherings are not only a great way to support local farmers but also a hub for community connection and discovering unique, high-quality items in a charming outdoor setting.

Cultural Events in Southampton, NY

Southampton hosts a variety of cultural events, including art exhibitions, live music performances, and annual festivals, celebrating its rich heritage and vibrant community spirit.

Annual Festivals and Celebrations

Southampton, NY, hosts a range of annual festivals celebrating its culture and heritage. The Hamptons Film Festival attracts filmmakers and cinephiles, while the Fourth of July Parade showcases patriotic spirit. The Harvest Festival highlights local produce and crafts, and the Southampton African American Museum’s Heritage Day honors the community’s history. These events offer a mix of art, music, and tradition, drawing visitors year-round.

Art Exhibitions and Galleries

Southampton, NY, is a haven for art enthusiasts, with numerous galleries showcasing local and international works. The Southampton Arts Center hosts rotating exhibitions, while the Parrish Art Museum features contemporary pieces. Local artists are celebrated through various installations, making the town a vibrant cultural destination. These spaces highlight Southampton’s rich artistic heritage and its commitment to fostering creativity.

Live Music and Theater Performances

Southampton, NY, offers a lively arts scene with live music and theater performances throughout the year. The Southampton Cultural Center and local theaters host productions ranging from classical plays to contemporary works. Outdoor concerts during summer months feature local and visiting artists, creating a vibrant atmosphere for residents and visitors alike. These events showcase Southampton’s thriving cultural and artistic community.

Where to Stay in Southampton, NY

Southampton offers a variety of accommodations, from luxury resorts to cozy vacation rentals, catering to diverse preferences and budgets, ensuring a comfortable stay for all visitors.

Luxury Hotels and Resorts

Southampton’s luxury hotels and resorts offer opulent amenities, including private beaches, spas, and gourmet dining. These establishments provide elegant rooms, premium services, and stunning views, catering to discerning travelers seeking exclusivity and comfort in a pristine coastal setting.

Budget-Friendly Accommodations

Southampton offers a variety of budget-friendly accommodations, including charming inns, cozy bed-and-breakfasts, and affordable vacation rentals. These options provide comfortable stays with essential amenities, perfect for travelers seeking cost-effective lodging without compromising on quality or charm. Many also offer convenient access to local attractions and beaches, making them ideal for those exploring the area on a budget.

Vacation Rentals

Southampton’s vacation rentals offer a diverse range of options, from cozy beach cottages to spacious villas, providing flexibility and comfort for all travelers. Many rentals feature fully equipped kitchens, private outdoor spaces, and proximity to beaches and attractions, making them ideal for families, couples, or groups seeking a home-away-from-home experience with convenience and charm.

Transportation and Getting Around

Southampton offers convenient transportation options, including public buses, bike rentals, and walking paths, making it easy to explore the town’s scenic beauty and attractions efficiently.

Public Transportation Options

Southampton’s public transportation includes buses operated by Suffolk County Transit, connecting residents and visitors to nearby towns and villages. Routes provide access to key locations, including beaches and shopping areas. The Hampton Luxury Liner and Long Island Rail Road also offer convenient links to New York City, making commuting and exploring the region straightforward and efficient.

Car Rentals and Parking

Car rentals are readily available in Southampton, with agencies offering a range of vehicles to suit different needs. Parking options include metered spots, public lots, and private garages. During peak seasons, parking permits may be required for certain areas. Renting a car provides flexibility for exploring the town and nearby attractions, while parking facilities are conveniently located to ensure easy access to shops, beaches, and cultural sites.

Bike Rentals and Walking Paths

Bike rentals are a popular way to explore Southampton’s scenic routes and beaches. Local shops offer a variety of bicycles, including cruisers and family-friendly options. Walking paths, such as those in Southampton Village and along the coastal trails, provide picturesque routes for pedestrians. These paths are well-maintained and perfect for enjoying the town’s natural beauty at a leisurely pace.

Insider Tips for Visiting Southampton, NY

Plan your visit with insider tips! Discover hidden beaches, top dining spots, and cultural events. Use Google to find the best local gems and ensure a memorable experience.

Best Times to Visit

Southampton, NY, is ideal to visit during spring and fall for mild weather and fewer crowds. Summer offers warm beaches and events, while winter provides budget-friendly options with limited activities.

Local Etiquette and Customs

Southampton, NY, values respect for its upscale community and natural beauty. Residents appreciate politeness and adherence to local norms, such as respecting private properties and supporting local businesses. Dressing appropriately for high-end venues and being mindful of beach and environmental regulations are also customary practices that reflect the town’s refined and eco-conscious culture.

Hidden Gems and Local Favorites

Discover Southampton’s lesser-known treasures, such as secluded beaches like Little Plains Beach and scenic trails at the Southampton Trails Preservation Society. Locals cherish spots like The Golden Pear for coffee and The Milk Pail for fresh produce. Explore unique art galleries and boutique shops along Jobs Lane, where community spirit and charm shine, offering a glimpse into the town’s authentic character and hidden delights.

classifying quadrilaterals worksheet pdf

Classifying quadrilaterals involves identifying their properties and categorizing them into types like squares, rectangles, and rhombuses. Worksheets and PDF resources provide visual guides for students to practice and master this skill effectively, enhancing their understanding of geometric shapes through interactive exercises and clear examples.

What Are Quadrilaterals?

Quadrilaterals are four-sided polygons with four vertices and four angles. They can be classified into various types, such as squares, rectangles, rhombuses, parallelograms, trapezoids, and kites, based on their properties. These shapes are fundamental in geometry, as they appear frequently in real-world objects and structures. Understanding quadrilaterals involves identifying their sides, angles, and parallel lines, which are essential skills for solving geometric problems and applying mathematical concepts in practical scenarios. Worksheets and PDF resources provide visual aids and exercises to help students master these shapes and their classifications.

Importance of Classification in Geometry

Importance of Classification in Geometry

Classifying quadrilaterals is essential for understanding their properties and relationships. It helps students recognize patterns, apply geometric principles, and solve problems effectively. By categorizing shapes, learners develop critical thinking and analytical skills. This process is fundamental for advanced geometry and real-world applications like architecture and engineering. Worksheets and PDF resources provide structured exercises, enabling students to master classification and apply these concepts confidently in various mathematical and practical scenarios. Effective classification enhances problem-solving abilities and deepens the understanding of geometric structures.

Key Concepts and Definitions

Understanding sides, angles, and parallel lines is crucial for classifying quadrilaterals into categories like squares, rectangles, rhombuses, parallelograms, trapezoids, and kites. These properties guide accurate identification and categorization.

Properties of Quadrilaterals

Quadrilaterals are defined by their sides, angles, and parallel lines. Key properties include having four sides, four angles, and 360 degrees total interior angles. Parallel lines and right angles distinguish shapes like rectangles and squares. Rhombuses have equal sides but angles vary, while parallelograms feature two pairs of parallel sides. Trapezoids are identified by at least one pair of parallel sides. Kites have two pairs of adjacent equal sides. These properties, highlighted in worksheets, help classify quadrilaterals accurately and understand their unique characteristics for geometry problems and real-world applications.

Differences Between Various Types of Quadrilaterals

Quadrilaterals vary significantly in their properties. Squares have equal sides and right angles, while rectangles have right angles but sides of varying lengths. Rhombuses feature equal sides but no right angles, and parallelograms have two pairs of parallel sides. Trapezoids are distinguished by at least one pair of parallel sides, and kites have two pairs of adjacent equal sides. These distinctions are crucial for accurate classification, as highlighted in worksheets, helping students understand the unique characteristics of each shape and their roles in geometry.

Types of Quadrilaterals

Quadrilaterals include squares, rectangles, rhombuses, parallelograms, trapezoids, and kites. Each type has distinct properties, such as equal sides, right angles, or parallel lines, aiding in their classification through visual guides and worksheets.

Squares, Rectangles, and Rhombuses

Squares, rectangles, and rhombuses are special quadrilaterals with unique properties. A square has four equal sides and four right angles, while a rectangle features opposite sides of equal length and four right angles. A rhombus, on the other hand, has four equal sides but angles that are not necessarily 90 degrees. Worksheets often include visual guides to help students distinguish these shapes by their side lengths and angles, ensuring accurate classification based on their geometric characteristics.

Parallelograms and Trapezoids

Parallelograms and trapezoids are distinct quadrilaterals with specific properties. A parallelogram has two pairs of parallel sides, while a trapezoid has only one pair of parallel sides. Worksheets often include diagrams where students identify parallel lines, measure angles, and apply definitions to classify shapes accurately. This hands-on practice helps reinforce the differences between these quadrilaterals, ensuring students can distinguish them based on their geometric characteristics and properties. Regular practice with such exercises enhances understanding and mastery of shape classification.

Kites and Other Special Quadrilaterals

Kites and other special quadrilaterals have unique properties that set them apart from basic shapes. A kite is characterized by two distinct pairs of adjacent sides that are equal in length. Additionally, kites have one pair of equal angles where the unequal sides meet, and their diagonals intersect at right angles. Worksheets often include exercises to identify and classify kites, as well as other less common quadrilaterals, by analyzing side lengths, angles, and diagonal properties. This helps students develop a deeper understanding of geometric diversity and classification accuracy through hands-on practice and visual examples.

Identifying Properties for Classification

Identifying properties like sides, angles, and parallel lines is crucial for classifying quadrilaterals. Worksheets guide students in checking these attributes for accurate classification.

Number of Sides and Angles

Quadrilaterals have four sides and four angles, totaling 360 degrees. Worksheets often include exercises where students count sides and measure angles to classify shapes. For example, squares have four equal sides and right angles, while rectangles have opposite sides equal and four right angles. Rhombuses and parallelograms also have four sides, but their angles can vary. Identifying these properties helps students determine the specific type of quadrilateral, making classification more straightforward and accurate with practice.

Identifying Parallel and Perpendicular Lines

Identifying parallel and perpendicular lines is crucial for classifying quadrilaterals. Worksheets often include exercises where students analyze shapes to determine if sides are parallel or if lines intersect at 90 degrees. For example, parallelograms have two pairs of parallel sides, while rectangles and squares also have perpendicular angles. Trapezoids are identified by having at least one pair of parallel sides. Kites may have perpendicular diagonals but no parallel sides. These skills help students accurately classify quadrilaterals and understand their geometric properties through hands-on practice.

The Classification Process

The classification process involves analyzing a quadrilateral’s properties, such as sides, angles, and parallel or perpendicular lines, to determine its specific type. Worksheets guide students through this systematic approach, helping them categorize shapes accurately and build a strong foundation in geometry.

Step-by-Step Guide to Classifying Quadrilaterals

A step-by-step guide to classifying quadrilaterals begins with identifying the number of sides and angles. Next, determine if opposite sides are parallel or if angles are right angles. Check for equal side lengths and whether diagonals are perpendicular. Use these properties to categorize the shape into specific types like squares, rectangles, rhombuses, parallelograms, or trapezoids. Worksheets often include visual examples and prompts to mark parallel lines and right angles, making the process interactive and accessible for learners.

Common Mistakes to Avoid

When classifying quadrilaterals, common mistakes include misidentifying parallel lines or right angles, leading to incorrect categorization; Students often confuse rhombuses with squares or parallelograms. Another error is assuming all trapezoids have only one set of parallel sides. Overlooking properties like equal side lengths or perpendicular diagonals can also lead to misclassification. Additionally, students may rely too heavily on visual appearance rather than verifying geometric properties. Regular practice with worksheets helps minimize these errors and improves accuracy in classification.

Using Worksheets for Practice

Printable PDF worksheets are essential for mastering quadrilateral classification. They offer structured exercises, visual aids, and guided practice, helping students identify and categorize shapes effectively in various learning settings.

Benefits of Printable PDF Worksheets

Printable PDF worksheets offer numerous advantages for learning quadrilateral classification. They provide structured exercises, visual guides, and self-assessment tools, making them ideal for independent study or classroom use. PDFs are easily accessible, free, and printable, ensuring students can practice anytime. The worksheets often include answer keys, allowing students to verify their work and understand mistakes. Interactive elements, like identifying parallel lines and right angles, enhance engagement. These resources cater to various learning styles, making them versatile for homeschooling, traditional classrooms, or tutoring sessions. Regular practice with these worksheets improves geometry skills and reinforces quadrilateral properties effectively.

How to Effectively Use Worksheets for Learning

To maximize learning, start by carefully analyzing each quadrilateral diagram, identifying properties like parallel lines, right angles, and equal sides. Use the provided answer keys for self-correction, ensuring understanding of mistakes. Gradually progress from simpler shapes to more complex ones, reinforcing concepts like squares, rectangles, and rhombuses. Regular practice helps build familiarity with classification criteria, while interactive elements, such as marking parallel sides, enhance engagement. By following these steps, students can systematically master quadrilateral classification and improve their geometry skills effectively.

Real-World Applications of Quadrilateral Classification

Quadrilaterals are fundamental in architecture, engineering, and everyday objects, such as designing buildings, bridges, and furniture, where understanding shape properties aids in structural integrity and aesthetic design.

Architecture and Engineering Examples

In architecture and engineering, understanding quadrilateral classification is essential for designing stable structures. Buildings, bridges, and frameworks often rely on shapes like rectangles, squares, and parallelograms for structural integrity. Architects use these shapes to create balanced and visually appealing designs. Engineers apply properties of trapezoids and rhombuses in constructing supportive frameworks. Classifying quadrilaterals helps professionals choose the most suitable shapes for specific projects, ensuring durability and aesthetic appeal. This practical application highlights the importance of geometric classification in real-world problem-solving and innovation.

Everyday Objects and Their Geometric Shapes

Quadrilaterals are abundant in everyday objects, making their classification a relatable learning experience. For instance, tabletops, picture frames, and book covers often form rectangles or squares. Road signs, such as stop signs, are octagons but surrounded by rectangular frames. Flooring tiles and pizza boxes also exemplify quadrilaterals like rhombuses and parallelograms. Recognizing these shapes in daily life helps students connect geometry to real-world scenarios, enhancing their ability to classify and understand quadrilateral properties effectively. This practical connection makes learning engaging and relevant, fostering a deeper appreciation for geometric concepts.

Mastering the classification of quadrilaterals is a fundamental skill in geometry, enhanced by worksheets and PDF resources. These tools provide structured practice, helping students identify and categorize shapes like squares, rectangles, and parallelograms. By understanding properties such as parallel lines and right angles, learners develop problem-solving abilities and spatial reasoning. As demonstrated through real-world examples and interactive exercises, classifying quadrilaterals bridges academic concepts with practical applications, ensuring a solid foundation for advanced geometric studies and everyday problem-solving scenarios.

ionic bonding worksheet with answers pdf

Ionic bonding is a fundamental concept in chemistry, involving the transfer of electrons between atoms to form ions. It is essential for understanding compound formation and chemical behavior.

What is Ionic Bonding?

Ionic bonding occurs when one or more electrons are transferred between atoms, resulting in the formation of ions with opposite charges. These ions are attracted to each other due to electrostatic forces, forming a strong chemical bond. Typically, metals lose electrons to become positively charged cations, while non-metals gain electrons to become negatively charged anions. This process leads to the creation of ionic compounds, which are often solids at room temperature and conduct electricity when dissolved in water.

Importance of Understanding Ionic Bonding

Understanding ionic bonding is crucial for grasping chemical compound formation and properties. It explains how metals and non-metals interact to create stable ions, forming solids with unique properties like conductivity. This knowledge is vital for chemistry, materials science, and everyday applications such as batteries, detergents, and fertilizers. Mastery of ionic bonding aids in predicting compound behaviors, solubility, and reactivity, making it foundational for advanced scientific and industrial applications.

Key Concepts in Ionic Bonding

Ionic bonding involves electron transfer between atoms, forming ions. Key concepts include ion formation, the octet rule, and achieving noble gas configurations for stability.

Electron Transfer and Ion Formation

Electron transfer occurs when metals lose electrons to non-metals, forming cations and anions. This process creates ions with opposite charges, enabling ionic bonds. Metals typically lose valence electrons to achieve a stable configuration, while non-metals gain electrons. The transfer results in the formation of positively charged cations and negatively charged anions, which attract to form ionic compounds.

The Octet Rule and Noble Gas Configuration

The octet rule states that atoms seek a stable electron configuration, typically eight valence electrons, resembling noble gases. In ionic bonding, metals lose electrons to form cations, while non-metals gain electrons to form anions, achieving this stable configuration. This process is fundamental to understanding how ionic compounds form and why they exhibit specific properties. Worksheets often include exercises to identify noble gas configurations and predict ionic compound formulas based on this rule.

Practical Exercises in Ionic Bonding

Worksheets include exercises like drawing Lewis structures, identifying ions, and writing formulas. Students practice transferring electrons and naming compounds, reinforcing ionic bonding concepts through hands-on activities.

Lewis Dot Structures for Ionic Compounds

Lewis dot structures are visual representations of electron distribution. For ionic compounds, students draw valence electrons, transfer them between atoms, and show ion formation. Worksheets provide exercises like sodium chloride or calcium oxide, guiding students to illustrate electron transfers and resulting ions. These activities help reinforce understanding of how ionic bonds form and chemical formulas are derived. Practice problems and answers are included for self-assessment and mastery.

Using the Crisscross Method to Write Ionic Formulas

The crisscross method simplifies writing ionic formulas by crossing charges of ions. Students identify the cation’s charge and anion’s charge, then exchange and reduce them to form the compound’s formula. Worksheets provide practice with examples like aluminum oxide or sodium chloride, ensuring mastery. Answers are included for verification, helping students grasp this essential skill in ionic bonding. This method is a cornerstone of chemical formula writing.

Naming Ionic Compounds

Naming ionic compounds involves identifying the cation and anion, using Greek prefixes for polyatomic ions. Examples include NaBr (sodium bromide) and CaCO3 (calcium carbonate). Worksheets provide practice.

Rules for Naming Ionic Compounds

Naming ionic compounds involves stating the cation first, followed by the anion. If the anion has a common name, like hydroxide or oxide, it is used. For polyatomic anions, prefixes indicate the number of atoms. Roman numerals in parentheses denote the charge of the cation. Worksheets provide exercises to practice naming compounds like sodium bromide and calcium carbonate, ensuring clarity and accuracy.

Practice Exercises in Naming Ionic Compounds

Practice exercises involve naming compounds like NaBr (sodium bromide) and CaCO3 (calcium carbonate). Students identify the cation and anion, apply prefixes for polyatomic ions, and use Roman numerals for cation charges. Worksheets provide structured questions, such as naming MgO (magnesium oxide) and Fe2O3 (iron(III) oxide), ensuring mastery of naming conventions and improving understanding of ionic compound nomenclature.

Differentiating Between Ionic and Covalent Bonds

Ionic bonds form between metals and non-metals via electron transfer, creating ions. Covalent bonds involve shared electrons between non-metals. Ionic compounds are typically stable solids, while covalent compounds vary widely in properties.

Key Differences Between Ionic and Covalent Bonds

Ionic bonds involve the transfer of electrons between atoms, typically forming between metals and non-metals. Covalent bonds involve shared electrons, usually between non-metals. Ionic compounds are solids with high melting points, while covalent compounds can be liquids or gases. Ionic bonds create charged ions, whereas covalent bonds result in neutral molecules. These differences impact their physical and chemical properties significantly.

Identifying Bond Types in Compounds

Identifying bond types involves analyzing the elements and their interactions. Ionic bonds form between metals and non-metals, involving electron transfer, while covalent bonds occur between non-metals, sharing electrons. Ionic compounds are often solids with high melting points, conduct electricity, and form ions in solution. Covalent compounds may be liquids, gases, or solids, do not conduct electricity, and form neutral molecules. Lewis structures and atomic properties help determine bond types.

Common Ionic Compounds and Their Properties

Common ionic compounds include sodium chloride (NaCl), calcium carbonate (CaCO3), and aluminum sulfate (Al2(SO4)3). These compounds are typically solids at room temperature and exhibit high melting points.

Examples of Common Ionic Compounds

Common ionic compounds include sodium chloride (NaCl), calcium carbonate (CaCO3), and aluminum sulfate (Al2(SO4)3). Sodium chloride is widely used as a food seasoning and in preserving. Calcium carbonate is found in limestone and is used in construction. Aluminum sulfate is utilized in water treatment and paper manufacturing. These compounds are essential in various industrial and household applications due to their unique properties and stability.

Physical and Chemical Properties of Ionic Compounds

Ionic compounds typically have high melting and boiling points due to strong electrostatic forces between ions. They are often solid at room temperature and conduct electricity when dissolved in water or melted. Many are water-soluble, though some exceptions exist. Their rigid lattice structures contribute to hardness and brittleness. These properties make ionic compounds useful in various industrial and household applications, leveraging their stability and conductivity for practical purposes.

Real-World Applications of Ionic Bonding

Ionic bonding is crucial in electronics, medicine, and construction materials, enabling technologies like batteries and ceramics. It also aids in creating soaps and fertilizers essential for daily life.

Role of Ionic Compounds in Everyday Life

Ionic compounds are integral to daily life, from table salt (NaCl) in food to detergents and soaps. They are used in construction materials like cement and in electronics. Many household items, such as toothpaste and cleaning agents, rely on ionic compounds for their effectiveness. Additionally, fertilizers and medications often contain ionic compounds, showcasing their versatility and importance in various industries and personal care products.

Industrial Applications of Ionic Bonding

Ionic bonding plays a crucial role in various industries, such as manufacturing, electronics, and pharmaceuticals. Ionic compounds are used in the production of metals, glass, and ceramics. They are also essential in batteries, semiconductors, and water treatment processes. Additionally, ionic compounds serve as catalysts in chemical reactions and are key components in detergents and cleaning agents. Their stability and conductivity make them invaluable in industrial applications, driving technological advancements and everyday operations.

Practice Problems and Answers

Engage with exercises to test understanding of ionic bonding, including Lewis structures, formulas, and compound naming. Solutions provided for self-assessment and mastery of key concepts.

Worksheet Exercises on Ionic Bonding

These exercises provide hands-on practice with ionic bonding concepts. Activities include determining ionic formulas, drawing Lewis structures, and identifying ions. Students can test their understanding by completing problems like writing the correct formula for calcium chloride or explaining electron transfer in aluminum oxide. Answers are included for self-assessment, ensuring mastery of key principles and preparing for advanced chemistry topics.

Answer Key and Explanations

The answer key provides detailed solutions to worksheet exercises, ensuring clarity and understanding. Explanations cover correct formulas, Lewis structures, and electron transfer processes. For example, calcium chloride’s formula is explained through crisscross method, while aluminum oxide’s structure is detailed with electron arrows. This resource helps students identify mistakes and grasp underlying concepts, enhancing their proficiency in ionic bonding and related chemical principles effectively.

Resources for Further Learning

Download PDF worksheets and study materials for in-depth practice. Visit online resources for additional exercises and explanations on ionic bonding.

Recommended Worksheets and Study Materials

Enhance your understanding with downloadable PDF worksheets, such as the Chemical Bonding Worksheet from SciLearn, featuring exercises on ionic and covalent bonds. Additional resources include the Unit 2 ― FT Chemistry Booklet, which covers Lewis structures, electron transfer, and naming compounds. These materials are suitable for grades 7–12 and include answers for self-assessment. Visit SciLearn for comprehensive practice.

Online Resources for Ionic Bonding

Access comprehensive online resources like SciLearn’s Chemistry 1001 worksheet, offering exercises on ionic bonding with solutions. Additionally, PhysicsAndMathsTutor.com provides detailed worksheets and answers. Video tutorials on platforms like Khan Academy and YouTube also offer visual explanations to aid learning. These resources are ideal for students seeking additional practice and a deeper understanding of ionic bonding concepts.

powerflex 4m drive manual

The PowerFlex 4M Adjustable Frequency AC Drive is a compact, versatile solution for motor speed control, ideal for machine-level applications. Designed by Allen-Bradley, it offers reliable performance, efficiency, and ease of use, catering to global OEMs and end-users. This manual provides essential information for installation, startup, and troubleshooting, intended for qualified personnel to ensure safe and effective operation of the drive.

1.1 Overview of the PowerFlex 4M Adjustable Frequency AC Drive

The PowerFlex 4M Adjustable Frequency AC Drive, manufactured by Allen-Bradley, is a compact and versatile motor control solution. Available in three frame sizes (A, B, and C), it supports voltage classes of 120, 240, and 480 volts. Designed for machine-level speed control, this drive offers application flexibility, meeting the needs of global OEMs and end-users. It provides essential tools for installation, startup, and troubleshooting, ensuring efficient operation.

1.2 Key Features and Applications

The PowerFlex 4M drive features an integral keypad for local control, compact frame sizes for space-saving installation, and compatibility with Modbus RTU communication. It is suitable for applications requiring precise motor speed control, such as pumps, fans, conveyors, and machine automation. The drive supports flexible parameter configuration, enabling tailored operation for various industrial needs, ensuring high performance and reliability across diverse applications.

Installation and Startup

Ensure proper installation by following pre-installation checks and safety guidelines. Use the integral keypad for initial configuration and startup, referencing the user manual for detailed instructions.

2.1 Pre-Installation Requirements and Safety Precautions

Before installing the PowerFlex 4M drive, ensure the environment meets specified voltage, temperature, and humidity levels. Verify grounding and shielding requirements to prevent EMI issues. Ensure personnel are qualified and follow safety guidelines, including disconnecting power before servicing. Refer to the user manual for detailed safety protocols to avoid hazards and ensure compliance with CE standards and electromagnetic compatibility.

2.2 Step-by-Step Installation Guide

Mount the PowerFlex 4M drive in a well-ventilated area, ensuring compatibility with its frame size and power rating. Connect input and output terminals according to the wiring diagram in the manual. Secure all connections tightly and ensure proper grounding for safe operation. Follow the sequence for power supply and motor connections. Refer to the user manual for specific torque and wiring recommendations to ensure reliable performance and compliance with safety standards.

2.3 Initial Startup and Parameter Configuration

Power up the drive and use the integral keypad to navigate through basic settings. Set the motor nameplate data, including voltage and frequency. Configure acceleration and deceleration times, and enable the desired control mode. Use DriveExplorer software for advanced parameter tuning. Initialize the drive by running a test motor to ensure proper operation and verify all settings are correctly applied before full production use.

Understanding the Hardware

The PowerFlex 4M drive is available in three frame sizes (A, B, and C), offering compact and efficient motor control solutions. Key components include the integral keypad, potentiometer, and power module, designed for reliable operation in industrial environments.

  • Frame sizes: A, B, and C.
  • Integral keypad for local control.
  • Potentiometer for speed adjustment.
  • Power module for efficient motor operation.

3.1 PowerFlex 4M Drive Components and Frame Sizes

The PowerFlex 4M drive consists of key components such as the control module, power module, and integral keypad. It is offered in three frame sizes—A, B, and C—each designed to accommodate varying power ratings and application requirements. Frame size A is the most compact, suitable for smaller applications, while frame size C provides higher power output for demanding industrial needs. This modular design ensures flexibility and scalability.

3.2 Input/Output Connections and Wiring Diagrams

The PowerFlex 4M drive features standard input/output terminals for line power, motor connections, and control signals. Detailed wiring diagrams in the manual illustrate proper connections for various configurations, including motor wiring, control circuits, and external devices. The drive supports multiple voltage ranges (120V, 240V, 480V) and includes provisions for shielding and grounding to ensure reliable operation and compliance with safety standards.

Configuration and Parameter Settings

The PowerFlex 4M drive offers intuitive configuration via its integral keypad and advanced parameter settings for customized operation, ensuring precise motor control and tailored functionality for specific applications.

4.1 Using the Integral Keypad for Basic Configuration

The integral keypad on the PowerFlex 4M drive simplifies basic configuration tasks. Users can navigate through a menu-driven interface to set operational parameters, such as motor speed, acceleration rates, and torque levels. The keypad also allows for monitoring of drive status and basic troubleshooting, making it an essential tool for quick setup and operation without requiring additional software.

4.2 Advanced Parameter Settings for Customized Operation

Advanced parameter settings on the PowerFlex 4M drive enable customized operation for specific applications. Users can adjust settings like torque limits, speed regulation, and motor compensation using DriveExplorer software or the integral keypad. These configurations optimize drive performance for precise control, ensuring tailored operation to meet unique application demands while maintaining efficiency and reliability.

Troubleshooting and Fault Resolution

The PowerFlex 4M drive’s troubleshooting involves identifying common faults, such as overloads or communication errors, and using the Fault Help Screen for diagnostic guidance and solutions.

5.1 Common Faults and Their Solutions

Common faults with the PowerFlex 4M drive include overcurrent, overload, and communication errors. Overcurrent faults often result from excessive motor load or short circuits, requiring inspection of wiring and motor operation. Overload faults indicate prolonged motor operation beyond rated capacity, necessitating adjustment of load or cooling. Communication errors may stem from incorrect Modbus settings or wiring issues, resolved by verifying configuration and connections.

5.2 Using the Fault Help Screen for Diagnostic Assistance

The Fault Help Screen on the PowerFlex 4M drive provides diagnostic assistance by displaying fault codes, descriptions, and possible solutions. It aids in identifying issues like overcurrent or communication errors, guiding users to resolve problems efficiently. This feature minimizes downtime by offering clear troubleshooting steps, ensuring optimal drive performance and reliability.

Programming and Control Interfaces

The PowerFlex 4M drive supports advanced programming through DriveExplorer software, offering intuitive configuration and control. It also features Modbus RTU communication and compatibility with industrial controllers for seamless integration.

DriveExplorer is a PC-based software tool designed for configuring, monitoring, and controlling the PowerFlex 4M drive. It provides a user-friendly interface for parameter setup, real-time monitoring, and advanced diagnostics. The software enables easy integration with PLCs and industrial controllers, supporting efficient programming and operation. DriveExplorer also offers troubleshooting features and compatibility with multiple drive models, making it a comprehensive solution for managing PowerFlex 4M drives effectively.

6.2 Configuring Modbus RTU Communication

Modbus RTU communication enables the PowerFlex 4M drive to integrate with industrial controllers and devices. To configure, set the baud rate, parity, and stop bits via DriveExplorer software. Assign the drive as a master or slave and define the Modbus address. Test communication to ensure proper data exchange. Refer to the user manual (publication 22F-UM001D-EN-E) for detailed parameter settings and troubleshooting guidance.

Safety and Compliance

Ensure proper grounding and follow safety guidelines when handling the PowerFlex 4M Drive to prevent electrical hazards. The drive meets CE conformity standards for electromagnetic compatibility, ensuring reliable operation in industrial environments.

7.1 Essential Safety Guidelines for Handling the Drive

Always disconnect power before servicing the drive. Wear appropriate personal protective equipment, including insulated gloves and safety glasses. Ensure proper grounding to prevent electrical shock. Avoid exposing internal components to moisture or contaminants. Follow all lockout/tagout procedures to ensure the drive is safely de-energized before maintenance. Never operate the drive in hazardous environments without proper certifications. Adhere to all local and international safety standards for industrial equipment.

7.2 CE Conformity and Electromagnetic Compatibility

The PowerFlex 4M drive complies with CE marking requirements, ensuring conformity with European Union directives on health, safety, and environmental protection. It meets electromagnetic compatibility standards, minimizing interference with other devices. Proper installation and grounding are essential to maintain EMC performance. Use shielded cables for I/O connections to reduce noise. The drive is designed to operate within specified ambient conditions to ensure compliance and reliable operation in industrial environments.

Maintenance and Technical Support

Regular maintenance is crucial for optimal performance. Clean the drive, inspect connections, and replace worn parts. For technical issues, contact Allen-Bradley support or refer to the manual.

8.1 Routine Maintenance Tasks

Regular maintenance ensures optimal performance. Clean the drive to prevent dust buildup, inspect all connections for tightness, and check fans for proper operation. Verify firmware updates, replace worn parts, and document maintenance activities. Always follow safety guidelines and manufacturer recommendations to maintain efficiency and prevent unexpected downtime.

8.2 Contacting Allen-Bradley Technical Support

For technical assistance, contact Allen-Bradley support directly. Prepare your drive’s model, serial number, and firmware version. Visit their official website or call the provided support hotline. Ensure you have the user manual and troubleshooting details ready. Support specialists can address complex issues, provide software updates, and offer personalized solutions to ensure optimal drive performance and resolve operational challenges efficiently.

Integration with Other Systems

The PowerFlex 4M drive seamlessly integrates with PLCs, industrial controllers, and other systems, supporting Modbus RTU communication for efficient control and data exchange, ensuring compatibility and adaptability in diverse applications.

9.1 Compatibility with PLCs and Other Industrial Controllers

The PowerFlex 4M drive integrates seamlessly with programmable logic controllers (PLCs) and industrial controllers, ensuring efficient control and communication. It supports Modbus RTU protocol for easy connectivity and data exchange. Compatibility with Allen-Bradley ControlLogix and CompactLogix systems enables straightforward integration into existing industrial automation setups, enhancing operational flexibility and performance across various applications.

9.2 Migration Guides from Older PowerFlex Models

Migration guides are available to assist users in transitioning from older PowerFlex models to the PowerFlex 4M drive. These guides provide step-by-step instructions for replacing and configuring the new drive, ensuring minimal downtime and seamless integration. They cover compatibility, parameter transfer, and operational setup, helping users maintain productivity while upgrading their systems to the latest technology.

Advanced Features and Diagnostics

The PowerFlex 4M drive offers advanced features like local potentiometer control and performance monitoring. These tools enhance operational precision and provide insights into drive functionality, ensuring optimal performance and quick issue resolution.

10.1 Using the Local Potentiometer for Operation

The local potentiometer on the PowerFlex 4M drive enables manual speed adjustment, allowing users to fine-tune motor operation directly from the drive. This feature is ideal for commissioning or adjusting motor speed without external devices. The potentiometer provides intuitive control, simplifying setup and offering precise speed regulation. It is an essential tool for ensuring accurate motor performance in various applications.

10.2 Monitoring Drive Performance

The PowerFlex 4M drive provides comprehensive monitoring capabilities through its integral keypad and DriveExplorer software. Users can track key parameters such as motor speed, current, voltage, and temperature in real-time. This feature ensures precise performance monitoring, enabling quick identification and resolution of issues, and helps maintain optimal drive operation and efficiency.

User Manuals and Documentation

The PowerFlex 4M drive is supported by comprehensive manuals, including the User Manual, Quick Start Guide, and Hardware Service Manual, ensuring detailed guidance for installation, operation, and troubleshooting.

11.1 Navigating the Official PowerFlex 4M User Manual

The official PowerFlex 4M user manual is structured to guide users through installation, operation, and troubleshooting. It includes detailed sections on parameter configuration, fault resolution, and advanced features. The manual is available in PDF format and can be downloaded from Rockwell Automation’s official website, ensuring easy access to essential information for optimal drive performance and maintenance.

11.2 Additional Resources and Guides

Beyond the official user manual, additional resources like quick start guides, hardware service manuals, and installation instructions are available. These documents provide in-depth details on specific aspects of the PowerFlex 4M drive. Rockwell Automation also offers technical support and migration guides for upgrading from older models. Supplementary materials, such as datasheets and catalogs, can be accessed online, ensuring comprehensive support for users.

The PowerFlex 4M drive offers efficient, reliable motor control solutions. With comprehensive support resources, it ensures optimal performance and adaptability for various industrial applications, making it a trusted choice;

12.1 Best Practices for Long-Term Use

Regular maintenance ensures optimal performance. Check for dust and contamination, ensure proper grounding, and verify all connections. Adhere to safety guidelines and update software periodically. Monitor drive performance and address faults promptly. Maintain a clean environment and avoid extreme temperatures. Refer to the user manual for specific care instructions and follow Rockwell Automation’s recommendations for longevity and reliability.

12.2 Continuous Learning and Updates

Stay informed about new features, enhancements, and best practices by regularly reviewing the official PowerFlex 4M user manual and Rockwell Automation resources. Subscribe to updates from Allen-Bradley to ensure you have the latest firmware and software tools. Utilize training materials and technical support for advanced troubleshooting and configuration. Continuous learning ensures optimal performance and compliance with the latest industry standards and safety guidelines.

scid interview pdf

The Structured Clinical Interview for DSM-5 (SCID-5) is a semistructured diagnostic tool used by mental health professionals to assess DSM-5 disorders. It ensures reliable and accurate diagnoses.

1.1 Overview of SCID-5

The SCID-5 is a semi-structured diagnostic interview guide for DSM-5 disorders‚ enabling clinicians to assess major mental health conditions. It provides a comprehensive framework for systematic evaluation‚ ensuring accurate diagnoses. The SCID-5 PDF includes detailed user guides‚ interview protocols‚ and correction documents‚ making it essential for both clinical practice and research applications.

1.2 Importance of SCID-5 in Mental Health Diagnosis

The SCID-5 is a cornerstone in mental health diagnosis‚ offering a standardized method to assess DSM-5 criteria. Its structured approach ensures consistency and accuracy‚ making it the gold standard for clinicians and researchers. The SCID-5 PDF enhances diagnostic reliability‚ aiding in precise patient evaluations and effective treatment planning across various clinical settings.

Key Features of the SCID-5 PDF

The SCID-5 PDF is a comprehensive diagnostic tool‚ featuring detailed interview guides‚ error correction documents‚ and updates. It provides structured questionnaires for assessing DSM-5 criteria‚ ensuring accurate and reliable diagnoses. The PDF includes modules for various disorders‚ aiding clinicians in systematic evaluations. It also offers scoring guides and interpretation tips‚ enhancing diagnostic precision and clinical decision-making.

2.1 Components of the SCID-5 PDF

The SCID-5 PDF includes detailed interview guides‚ modules for assessing various DSM-5 disorders‚ and error correction documents. It incorporates diagnostic criteria checklists‚ scoring sheets‚ and instructions for administration. The PDF also provides updates and revisions‚ ensuring users have the most accurate tools for conducting structured clinical interviews. These components facilitate systematic evaluations and reliable diagnoses across clinical and research settings.

2.2 Benefits of Using the SCID-5 PDF

The SCID-5 PDF offers a standardized and comprehensive approach to diagnosing DSM-5 disorders‚ enhancing accuracy and consistency. It streamlines the diagnostic process‚ saving time while ensuring thorough evaluations. Clinicians benefit from clear scoring guidelines‚ while researchers appreciate its reliability. The PDF format allows easy access and updates‚ making it a versatile tool for both clinical practice and research applications.

Purpose and Uses of the SCID Interview

The SCID Interview is designed to systematically evaluate DSM-5 diagnoses‚ ensuring accurate and reliable assessments. It serves as a crucial tool for both clinical practice and research‚ aiding professionals in diagnosing mental health conditions effectively.

3.1 Clinical Applications

The SCID-5 is widely used in clinical settings to diagnose mental health conditions accurately. It aids professionals in identifying DSM-5 disorders‚ guiding treatment plans‚ and ensuring comprehensive patient evaluations. Its structured approach helps clinicians assess symptoms systematically‚ improving diagnostic reliability in various mental health facilities‚ hospitals‚ and private practices. This tool is essential for differential diagnosis and informing evidence-based interventions.

3.2 Research Applications

The SCID-5 is a gold standard in mental health research‚ providing reliable and consistent data for studies. It is used to assess participants‚ validate diagnostic criteria‚ and ensure consistency across studies. Researchers rely on its structured format to collect accurate data‚ making it essential for psychiatric studies‚ clinical trials‚ and epidemiological research. Its validity and reliability enhance the credibility of research findings.

Structure of the SCID-5 Interview

The SCID-5 interview is organized into modules‚ each focusing on specific DSM-5 disorders. It includes sections for screening‚ in-depth assessment‚ and differential diagnosis‚ ensuring comprehensive evaluation.

4.1 Modules and Sections

The SCID-5 is divided into modules‚ each addressing specific DSM-5 disorder categories. Sections include screening questions‚ in-depth assessments‚ and differential diagnosis. The interview begins with an overview‚ followed by modules for major mental disorders‚ ensuring systematic evaluation. Each section guides clinicians through symptoms‚ severity‚ and criteria‚ enhancing diagnostic accuracy. The structure ensures comprehensive coverage while maintaining clinical flexibility.

4.2 Organization and Flow

The SCID-5 is organized to ensure a logical flow‚ beginning with an overview of the interview process. It progresses through modules‚ each focusing on specific diagnostic categories. The structure allows clinicians to systematically assess symptoms‚ ensuring thoroughness and accuracy. The flow is designed to minimize redundancy‚ guiding the interviewer from general to specific inquiries. This organization enhances diagnostic clarity and efficiency‚ making it adaptable to diverse clinical scenarios.

Administration and Scoring

The SCID-5 requires trained professionals to conduct interviews‚ ensuring accurate DSM-5 diagnoses. Scoring involves evaluating symptoms and severity‚ with clear guidelines for interpretation and documentation.

5.1 Conducting the Interview

Conducting the SCID-5 interview requires a trained clinician to systematically evaluate symptoms across various modules. The semistructured format allows for clinical judgment‚ ensuring accurate DSM-5 diagnoses. Clinicians consider the patient’s history and gently confront symptoms to clarify their presence and severity. This process demands strong clinical expertise and adherence to the SCID-5 guidelines.

5.2 Scoring and Interpretation

The SCID-5 interview results are scored based on symptom presence and severity‚ guiding DSM-5 diagnosis. Clinicians interpret the findings‚ considering clinical judgment and patient context. The process ensures accurate diagnoses‚ blending structured assessment with professional expertise to synthesize symptoms into clear diagnostic categories. Proper interpretation requires understanding DSM-5 criteria and clinical experience.

Training Requirements

Training is essential for effectively using the SCID-5‚ ensuring accurate diagnoses. It is designed for mental health professionals‚ with resources like guides and courses available to enhance proficiency.

6.1 Importance of Training

Proper training is crucial for accurately administering the SCID-5‚ ensuring reliable and valid diagnostic results. It equips professionals with the skills to navigate the interview effectively‚ interpret responses‚ and apply DSM-5 criteria correctly. Training enhances clinical judgment‚ reducing errors and improving diagnostic accuracy‚ which is essential for both clinical practice and research applications.

6.2 Training Resources and Programs

The SCID-5 training resources include guides‚ manuals‚ and workshops available on SCID5.org. These materials provide detailed instructions for administering the interview and interpreting results. Additionally‚ the American Psychiatric Association Publishing offers licensing and permissions for the SCID-5-RV‚ ensuring access to official training tools. These resources help professionals master the SCID-5‚ enhancing diagnostic accuracy and clinical expertise.

Strengths of the SCID-5

The SCID-5 is a reliable and valid diagnostic tool‚ widely regarded as the gold standard for assessing DSM-5 disorders. Its structured format ensures consistency and accuracy.

7.1 Reliability and Validity

The SCID-5 demonstrates strong reliability and validity‚ serving as the gold standard for DSM-5 diagnoses. Its structured format ensures consistency across interviews‚ enhancing inter-rater reliability. Validated across diverse populations‚ it provides accurate diagnostic assessments‚ making it a trusted tool in both clinical and research settings. Its robust psychometric properties underscore its effectiveness in mental health evaluation.

7.2 Comparisons with Other Diagnostic Tools

The SCID-5 stands out among diagnostic tools for its comprehensive‚ DSM-5-aligned structure. Unlike checklists or self-report measures‚ it requires clinical expertise‚ ensuring nuanced evaluations. While tools like the CIDI are used by lay interviewers‚ the SCID-5’s clinician-administered approach enhances diagnostic accuracy‚ making it superior for complex assessments. Its depth and reliability set it apart in clinical and research applications.

Limitations of the SCID-5

The SCID-5 requires extensive training and clinical expertise‚ limiting its accessibility. Its time-intensive nature and reliance on interviewer judgment can introduce variability in assessments.

8.1 Time Requirements

The SCID-5 is a time-intensive tool‚ requiring extended periods to conduct a comprehensive interview. Assessing both current and lifetime diagnoses can prolong the process‚ potentially limiting its use in fast-paced clinical settings. This extensive time commitment may challenge practitioners seeking efficient diagnostic methods‚ emphasizing the need for trained professionals to manage time effectively while ensuring accuracy.

8.2 Need for Clinical Expertise

The SCID-5 requires significant clinical expertise to administer effectively. Practitioners must possess a deep understanding of DSM-5 criteria and nuanced symptom presentations. Inexperienced users may struggle to interpret responses accurately‚ potentially leading to diagnostic errors. Proper training and licensure are essential to ensure reliable and valid assessments‚ making it less accessible to non-specialists in mental health settings.

Applications in Clinical Practice

The SCID-5 is widely applied in various clinical settings‚ aiding mental health professionals in diagnosing DSM-5 disorders accurately across diverse patient populations‚ enhancing treatment planning and outcomes.

9.1 Use in Different Clinical Settings

The SCID-5 is utilized in various clinical settings‚ including hospitals‚ outpatient clinics‚ and private practices‚ by mental health professionals to diagnose DSM-5 disorders. Its structured format ensures consistency and accuracy across diverse patient populations. The SCID-5 is particularly valuable in settings requiring rigorous diagnostic assessments‚ such as research institutions and specialized treatment centers‚ where precise diagnoses are critical for effective care.

9.2 Application Across Patient Populations

The SCID-5 is widely applied across diverse patient populations‚ including adults‚ adolescents‚ and individuals with complex mental health conditions. Its structured format ensures consistent diagnoses for various disorders‚ such as PTSD‚ substance use disorders‚ and personality disorders. The tool is particularly effective in assessing individuals with co-occurring conditions‚ making it a versatile instrument for comprehensive diagnostic evaluations.

Updates and Revisions

The SCID-5 undergoes regular updates to incorporate DSM-5 revisions and improve diagnostic accuracy. A PDF document detailing corrections and updates is available on www.SCID5.org for reference.

10.1 History of SCID Updates

The SCID has evolved significantly since its inception‚ with updates reflecting changes in DSM criteria. The transition from SCID-IV to SCID-5 incorporated DSM-5 revisions‚ enhancing diagnostic clarity. Regular updates ensure the tool remains aligned with current psychiatric standards‚ providing a reliable framework for clinical and research applications. These updates are detailed in PDF documents available on the official SCID website for professional reference.

10.2 Improvements in SCID-5

SCID-5 introduces enhanced clarity in diagnostic criteria and updated modules reflecting DSM-5 changes. It includes new sections for emerging disorders and improved organization for easier navigation. Correction documents and updates are available in PDF format‚ ensuring users have access to the most accurate tools. These improvements enhance diagnostic accuracy and streamline the assessment process for both clinicians and researchers.

Resources and Support

SCID-5 offers comprehensive guides‚ manuals‚ and correction documents available in PDF format. Visit www.SCID5.org for updates‚ ensuring accurate and informed clinical practice.

11.1 Availability of Guides and Manuals

The SCID-5 provides comprehensive guides and manuals to aid professionals in conducting accurate interviews. PDF documents‚ including user guides and score sheets‚ are available for download. Correction documents and updates are regularly published online‚ ensuring users have access to the most current information. These resources are accessible via the official SCID-5 website and other authorized platforms‚ supporting effective clinical and research applications.

11.2 Correction Documents and Updates

The official SCID-5 website offers correction documents and updates in PDF format. These documents list errors found‚ affected modules‚ and detailed explanations for updates. Regular revisions ensure the tool aligns with DSM-5 standards‚ providing users with accurate diagnostic criteria; Updates are accessible online‚ helping professionals maintain reliability and validity in their assessments. This ensures the SCID-5 remains a gold standard in mental health diagnosis.

Comparison of SCID-5-CV and SCID-5-RV

The SCID-5-CV is designed for clinical use‚ while the SCID-5-RV is tailored for research‚ offering more detailed assessments. Both require proper licensing for use.

12.1 Differences in Structure and Use

The SCID-5-CV is structured for clinical settings‚ focusing on essential diagnostic criteria‚ while the SCID-5-RV is more detailed‚ suited for research. The CV includes a User’s Guide and interview guide‚ whereas the RV contains additional modules and score sheets for comprehensive data collection. Both require licensing but cater to different audiences: clinicians versus researchers.

12.2 Clinical vs. Research Orientations

The SCID-5-CV is tailored for clinical practice‚ aiding professionals in diagnosing DSM-5 disorders efficiently. In contrast‚ the SCID-5-RV is designed for research‚ offering detailed assessments and comprehensive scoring systems. While the CV focuses on practical application‚ the RV emphasizes thorough data collection for scientific studies. Both versions ensure accuracy but serve distinct purposes based on their primary use.

Future Directions

Future advancements may include digital integration‚ enabling remote SCID-5 interviews and real-time data analysis. Technological innovations aim to enhance accessibility and efficiency for both clinical and research applications.

13.1 Technological Advancements

The SCID-5 is transitioning into digital formats‚ enhancing accessibility and efficiency. Technological advancements include PDF versions for easy access and integration with digital tools for real-time data analysis. Automated scoring and remote administration capabilities are being explored to streamline the interview process. These innovations aim to support clinicians and researchers while maintaining the tool’s reliability and validity in mental health diagnosis.

13.2 Integration with Digital Tools

The SCID-5 is being integrated with digital tools to enhance its utility. PDF versions are now compatible with electronic health records‚ enabling seamless documentation; Additionally‚ mobile apps and cloud-based platforms are being developed to support remote interviews and data sharing. Such integrations aim to improve efficiency‚ reduce errors‚ and facilitate collaboration among mental health professionals in diverse clinical settings.